Wednesday, June 30, 2010

Download attachment from GMAIL

1. Sign in GMAIL, open the message which contains an attachment.


2. Scroll down until you see the “Download” beside the attachment. Click “Download”.


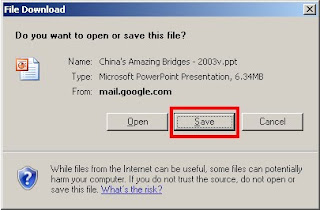
3. A message box, Click “Save” button.


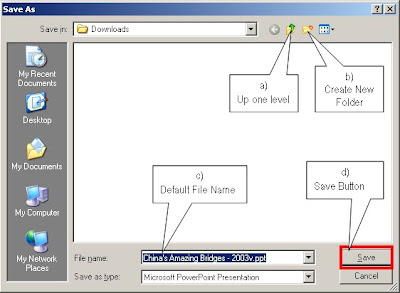
4. Another message box prompts to ask for the location to save. Choose the folder or correct place to save the attachment.

a. Click this button to go up one level (the highest is “My Computer”)

b. Click this button if you wish to create new folder in the current folder (In the following screen, the current folder is “Downloads” )

c. This is the default file name, can change to other file name

d. If the folder is correct, file name also correct, click “Save” button to start the download.


5. Wait for download to complete.

a. Check “Close this dialog box when download completes”, this setting will auto complete the process when download finished.
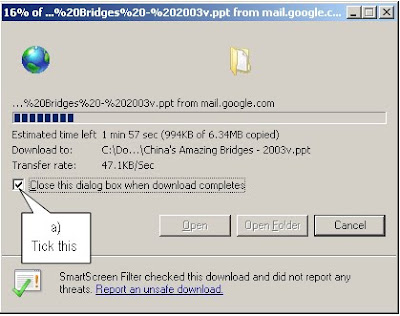


6. Continue with other downloads and repeat from step 1.

Wednesday, August 12, 2009

Enable SQL Authentication Mode

During the MS SQL installation, you can choose the login authentication mode. It's always better to install mix mode which allow windows & SQL authentication mode login.

I hide the advanced installation setting during installation & ended to only have windows authentication login at the MS SQL server.

I manage to change the setting through SQL Management Studio and restart the SQL service once confirm the changes. Now MS SQL can login either in windows authentication or SQL authentication.

Here's the summary & screen shots to create sa account for SQL authentication mode.

1. Login. Open SQL Management Studio. Login with windows authentication mode.


2. Find sa account. On Object Explorer, expand Security, expand Logins, right-click sa, and then click Properties.


3. Create Password for sa account. On the General page, you might have to create and confirm a password for the sa login. On Status page, enable sa account login.


4. Open Object Explorer Properties. Right-Click Object Explorer, click Properties.


5. Change login mode. Select Security and choose "SQL Server and Windows Authentication Mode" for Server Authentication. Click OK to confirm the changes.


6. Acknowledge notification. On the SQL Server Management Studio dialog box, click OK to acknowledge the requirement to restart SQL Server.


7. Restart. On Object Explorer, right-click your server, and then click Restart. If SQL Server Agent is running, it must also be restarted.


8. Reconnect to verify. Disconnect the object explorer, connect again by using SQL Authentication Mode. Use the sa account and password you set previously.

Sunday, August 9, 2009

Macro Security Setting in Excel 2007

MS Excel 2007 uses different interface design compare to previous version. Sometimes it is quite difficult to find a setting or button in Excel 2007.

I use to set macro in the Excel either by recording macro or VBA programming. Recently one of the Excel 2007 faced "cannot run macro". This also give me a chance to explore Excel 2007.

In older version Excel, I normally set the macro security to medium, system will prompt whether to enable or disable macro when the file open.

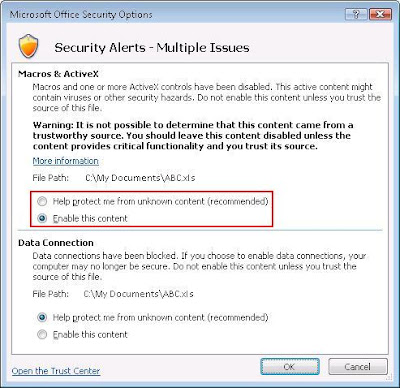
In Excel 2007, the macro security changed. By default, the macro security set to 'Disable all macros with notifcation'. If your file contains macro, a Security Warning button will appear.


Click at the options button to change the setting to enable content (macro).


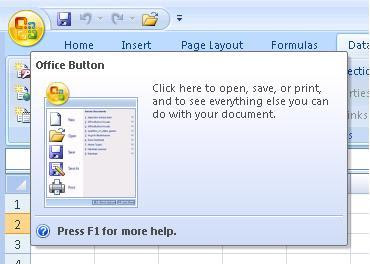
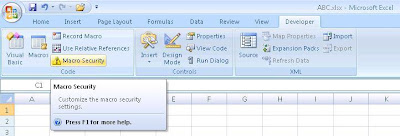
But some of my VBA program need to run VBA macro during startup, so I have to find change the Macro Security under Developer tab. By default, this tab is hiding, have to enable from Office Button.


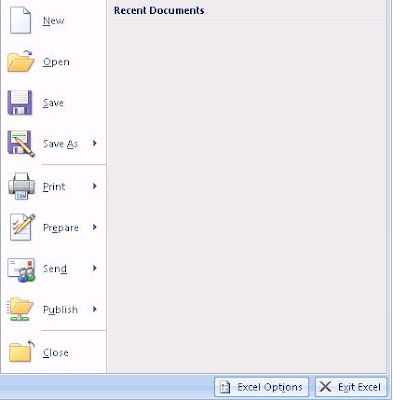
Click the Excel Options button after you click the Office button.


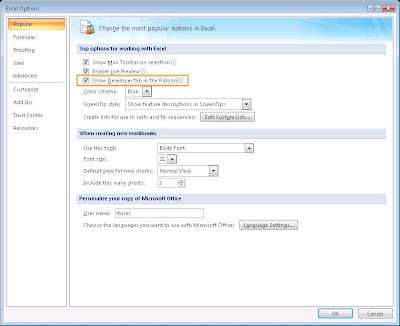
Under Popular tab, tick to enable Show Developer Tab In The Ribbon. The developer tab will appear after the changes.


Click at the Macro Security to change the security setting.


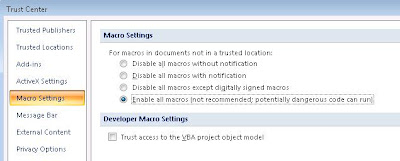
You will notice the security level is different compare to older Excel version. If you always run VBA program, just tick Trust access to the VBA project object model.

If you choose Enable all macros, the Security Warning button will not appear. Because of virus issue, be careful in changing the macro security settings.

Saturday, August 8, 2009

Use VBA To Refresh Pivot Table

Pivot Table is a useful tool in MS Excel. It summaries the data from Excel or other external databases such as MS Access, MS SQL, MySQL, AS400 etc.

Normally, right click at the pivot table, then choose 'Refresh' from the shortcut menu to update the data. You need to click twice to finish this process. If you prefer to simplify this step, create a button and have a simple VBA code on it to update the pivot table.

1. Know the pivot table name. Right click at the pivot table, click at 'Table Options'.

This pivot table name is PivotTable1. This name is important during the VBA code creation.


2. Create a Command Button. We will put VBA code inside this button. Future data update will become simple and fast with just a click at the button.

Find Control Toolbox. Click at View> Toolbars > Control Toolbox

Select the Command Button.


Locate a place to draw the button.


3. Change the button display name. Right click the button to find 'Properties'. Under 'Caption' change the name to 'Refresh'.


4. Create VBA Code. Close the Properties window, double click the button. A Visual Basic windows will pop up with some coding appear like this:

Private Sub CommandButton1_Click()

End Sub


Add ActiveSheet.PivotTables("PivotTable1").PivotCache.Refresh between these two lines. This command will refresh 'PivotTable1' in the sheet where the button is pressed.

The complete code should look as follow:-

Close Visual Basic windows after this.


5. To complete the process. Return to the Control Toolbox and click at the first button to exit the design mode. Close the Control Toolbox after this.


Now, when you click the button, the pivot table will be updated.